Inspired heavily by the early work of Guy Ritchie:
Col B.
Inspired heavily by the early work of Guy Ritchie:
Col B.
Shot on Blackmagic Cinema Camera with a Xeen 24mm T1.5 Cinelens
B Cam – Canon 5Dmk3, MagicLantern RAW w/ Tokina 11-16 and Zeiss 35m Flektagon F2.4
– Col B.
New clip dropping 11.3.2017 for Gold Coast legends Kaosphere. Trailer below:
– Col B.
My latest, filmed on BMCC, 5dmk3 (w/ MagicLantern), Glidecam and a Dji Phantom 3
– Col B.
After hunting around on the net and various sources for a simple guide on how to get your DSLR or whatever footage into the 2:35:1 Anamorphic format I have decided to write my own. This method will allow you to export to Vimeo and Youtube without the black bars showing when the video is embedded.
1. Firstly download this PSD file from the following link – https://www.dropbox.com/s/9twrgw4zyr7r50p/CBC235Template.psd
2. The above will be your template/guide for aligning your footage in the timeline. Import the above template into Premiere (if using FCP convert this to a PNG and go from there) and place in your timeline above all video tracks so that it sits on top. Note below that the 2:35:1 marks are not yet turned on, as shown in the program monitor.

3. Once inserted into the timeline, make the template visible and lock it from being editable as shown below. You will now have black bars top and bottom of your program monitor. Now import and edit your footage as required:

4. Once editing you might find that you aren’t happy with where the shot lies e.g. the actor’s eye-line is cutoff or an important piece of scene information is missing due to the 2:35:1 crop area. This is now the time to reposition the image to highlight what you want seen. This is one of the great advantages of 2:35:1, you can force the viewer to look at a desired focal point.
Select each individual clip and then select Motion from the effects menu and change the relevant position numbers of the clip. The number you are wanting to effect should default to 540 in a 1080p clip. Simply decrease the number to move the video up and increase to move down. Bare in mind that moving it too far will increase the area of black space at the top or bottom of the screen beyond that of the 2:35:1 framing.
5. Now your ready to export your video. Follow the usual path File – Export – Media. Here you want to setup the export settings. I recommend the following, and it must be done in this order or else the Output resolution will continue to reset to 1920×1080.

Settings (as above and below):
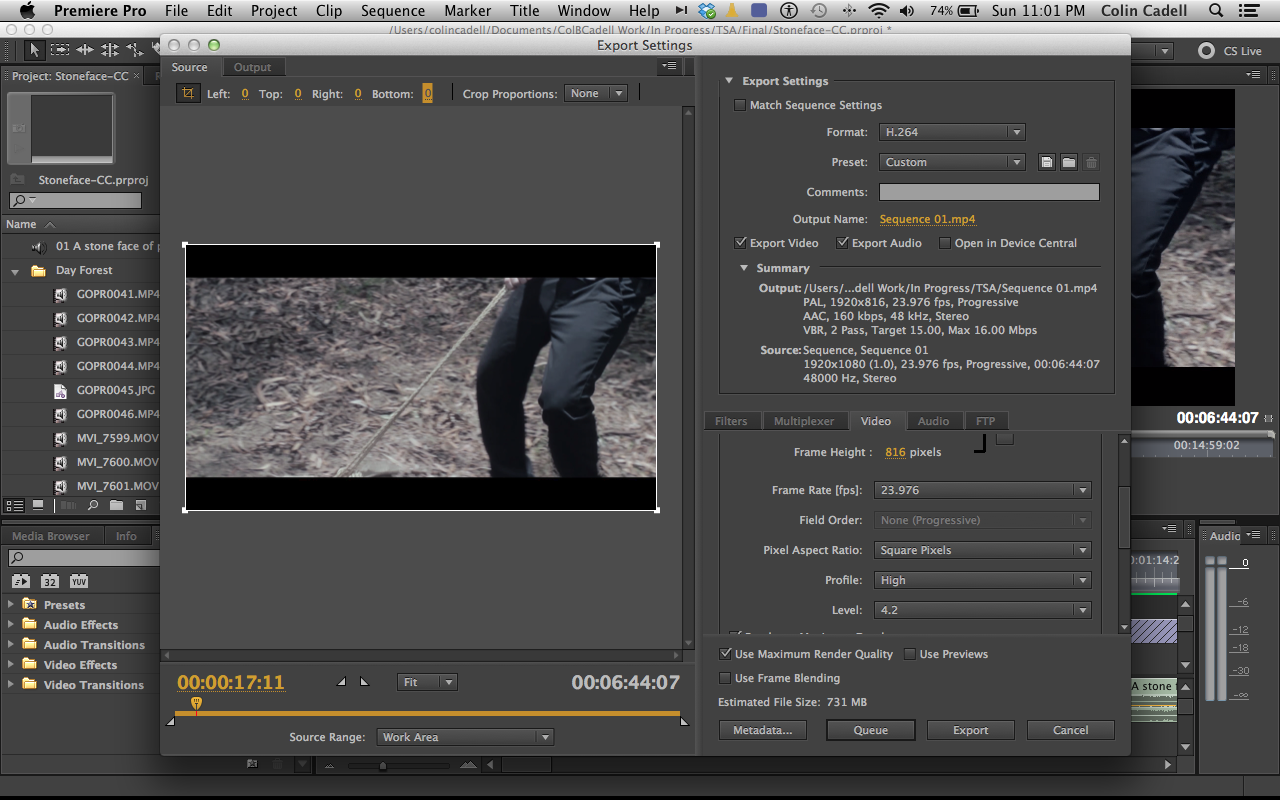
6. The final step is the cropping of the video to make sure it meets the required output. While you have already set the output size (1920×816), you will now need to set the crop. Crop your source at the top (132) and bottom (131) to remove the black lines and enable your video to embed in widescreen, rather than with the annoying black bars.
Once the crop has been done and the output view looks to only show the cropped video, then you may export.

So why go through all the effort? Simple if you export a file setup to be 2:35:1 via the normal export route, you will find that it retains black bars, top and bottom even if embedded (as below). Some people don’t mind that, but I personally think it’s sloppy and really effects the embedded view of your videos.

By completing the steps above you will now have an embedded view that looks like this:

Simple, clean and ready for Vimeo and Youtube upload without those pesky black bars.
– Col B
